SumRndmDde's Character Creator-EX plugin: F.A.Q's

● ARCHIVED · READ-ONLY
Started by Rhino 113 posts Page 5 of 6 View original ↗
  1. lesbrarians said:
    2. I'm not using side view/battlers. How can I remove that sprite from the character creator?
    I know you solved this by dragging the window off screen with Super Tools but you can also comment out line 1390 in SRD_CharacterCreatorEx so it doesn't add that window in the character creator screen.

    1732585908465.png
  2. Rhino said:
    @Mega Man Volnutt Yup, that's possible! However it'd mean replacing over the dead pose, so that'd no longer be an option for any custom characters, if you're cool with that. :cutesmile: You'd also only be able to use a one-directional sprite with 3 frames, just like how the dead poses work. (Editing the plugin to have more options may be possible, but that's outside my scope I'm afraid!)

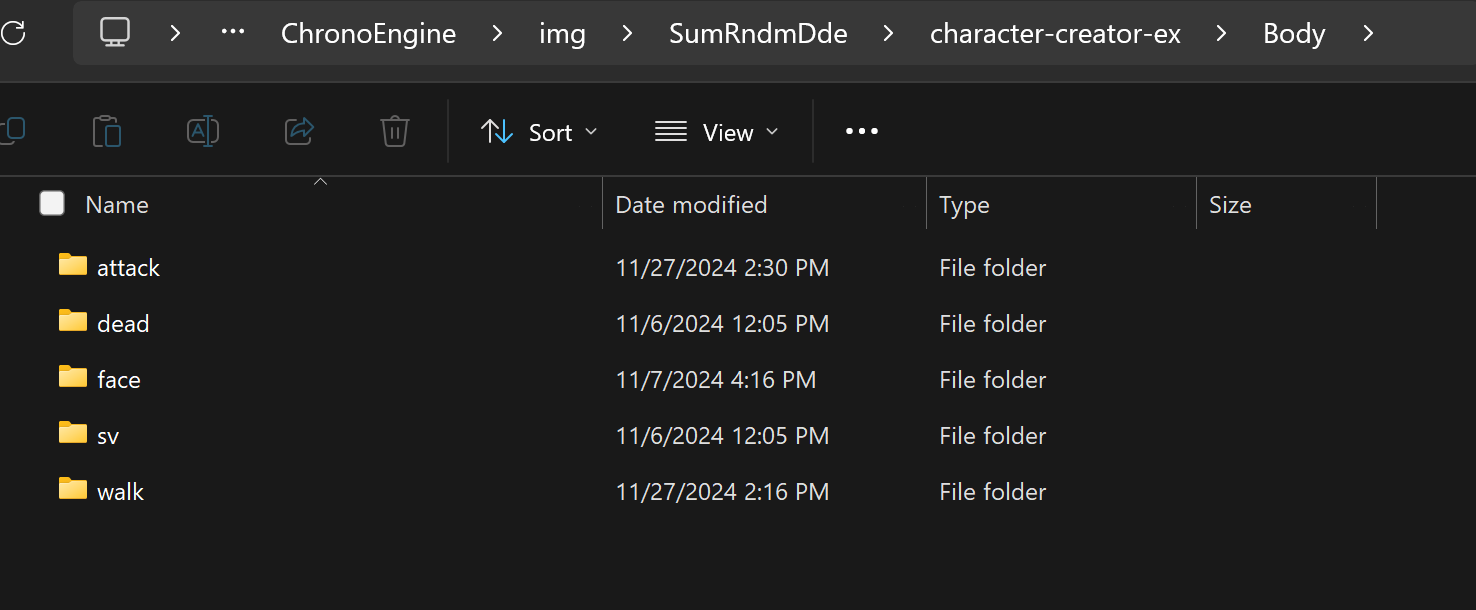
    Replacing the dead characters can be done all via the images, no need to mess with any plugin parameters or filenames! Locate your game folder img>Sumrndmdde>character-creator-ex. These are split up into layer parts, and then divided into the types. We're interested in all of the 'dead' folders.
    So I've been playing around with this plugin for the past couple weeks and was able to add additional poses but it is kind of a PITA and requires a lot of editing of the plugin file. Basically you need to add new sections for each pose in the plugin file. Do a search for "dead" in the plugin file and every time that term comes up, you also have to make an equivalent section for your new pose.

    For example, I copied the "dead" section here and made an "attack" section (under the //edit note)
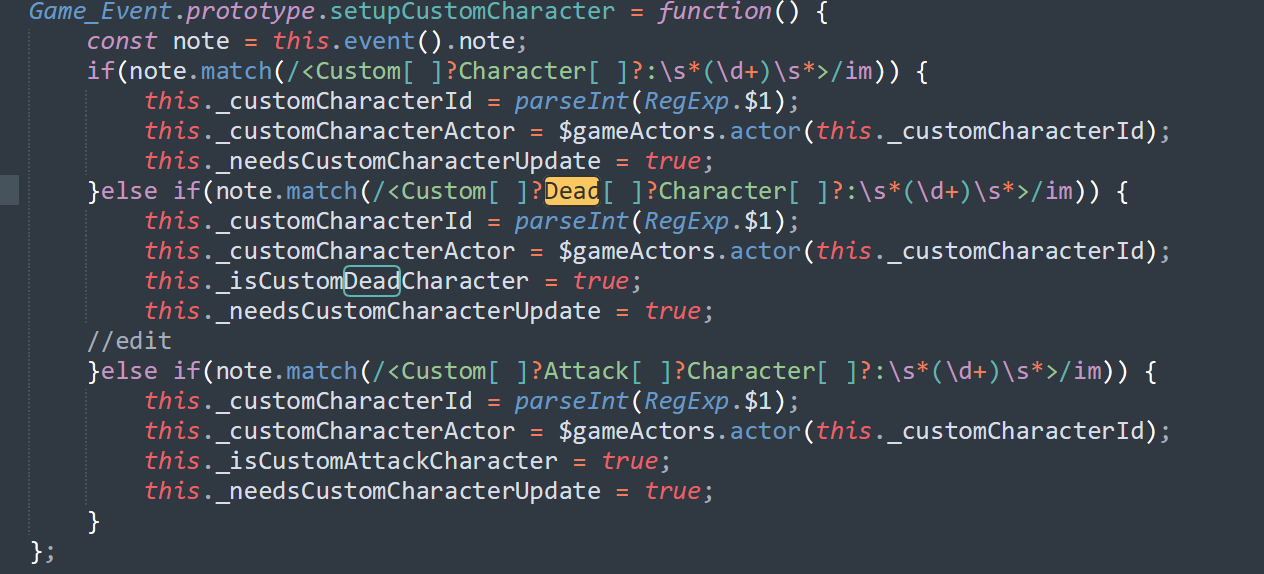
    1732747304561.png

    HOWEVER, if your pose is four directions (instead of 1 like the dead sprite) you need to copy the base/walking functions instead for a couple sections.

    For example, I copied "buildBitmap" to make "buildBitmapAttack" instead of copying "buildBitmapDead" because I wanted four directions for attack
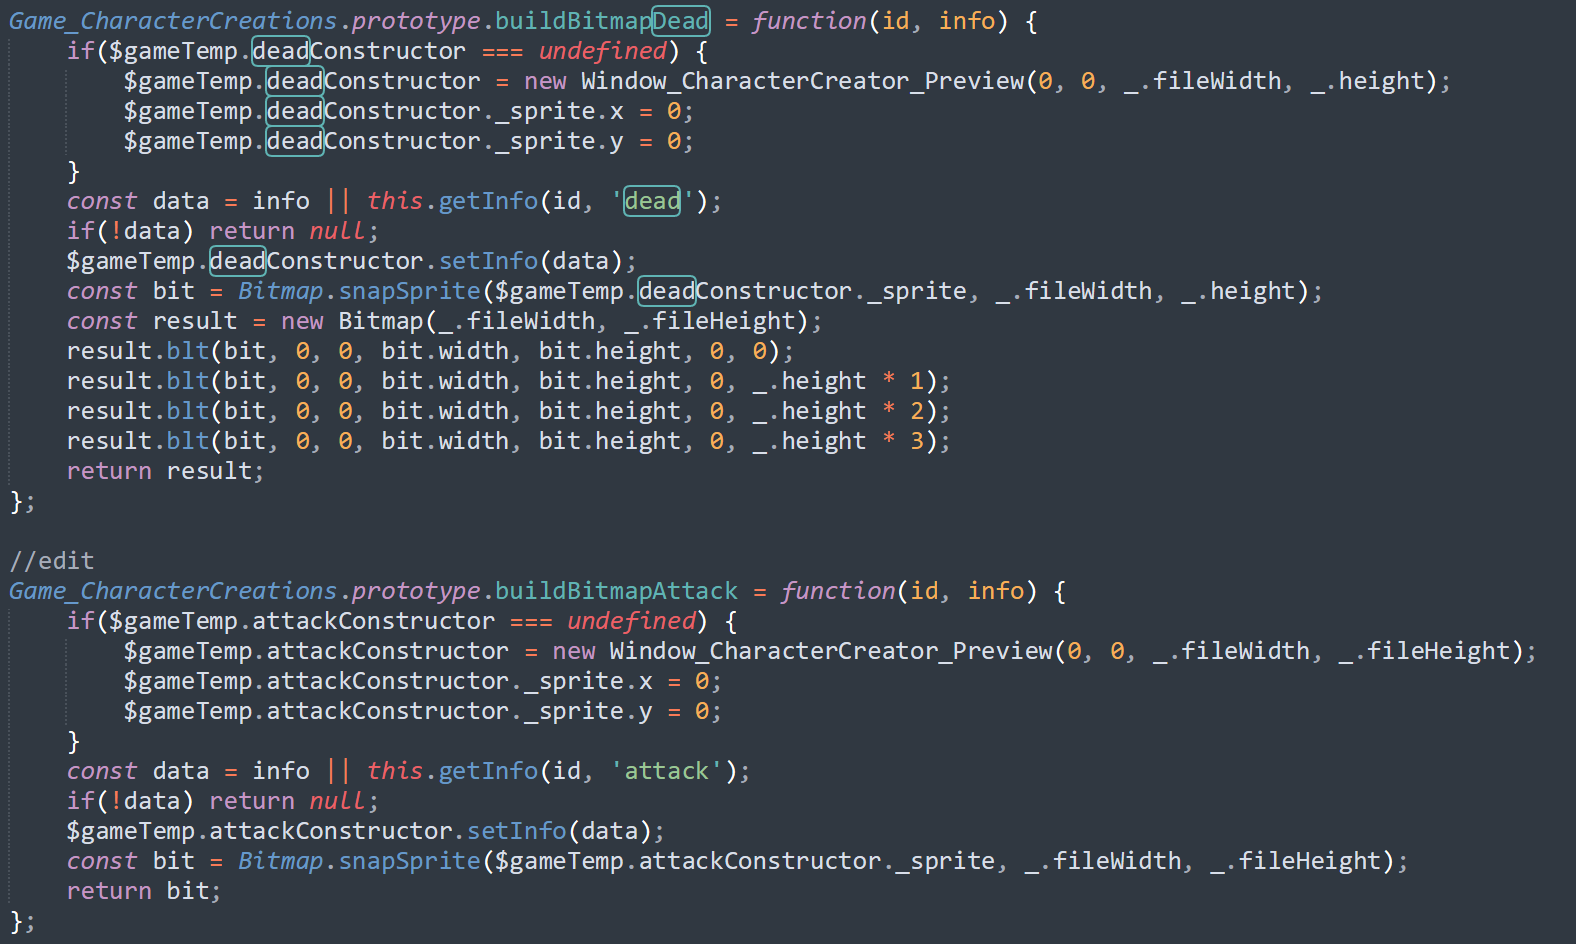
    1732748065425.png
    Then you also need to make "attack" (or whatever pose) folders with all the associated parts in them for everything (body, clothes, etc).
    1732747409844.png

    To change your custom character to the new pose use the following scripts:

    1732747726116.png
    Where 1 is the actor number. If you want to change back to the normal walking sprite change true to false in the first line.

    Do you have to do all this work?
    Yes, after all, all that work was done to add the dead pose in the first place. It's either that or overwrite the dead pose like Rhino said, but then you don't have the dead pose and are restricted to one direction.
  3. WereWorld said:
    Hello,
    I am looking for a way to force the custom actor into wearing a piece of clothing.

    I know that by using the "Print to console" I can force an entire preset, but is there a way to only change a specific parameter (in my case, "Clothing")?

    Thank you
    You can force a change to clothing with the following script
    Code:
    var b= 1; //actor ID here
    $gameCharacterCreations._data[b].Clothing.file="Clothing (2)"; //put the file name in the quotes here
    $gameCharacterCreations._dataDd[b].Clothing.file="Clothing (2)";
    $gameCharacterCreations._dataFace[b].Clothing.file="Clothing (2)";
    $gameCharacterCreations._dataSv[b].Clothing.file="Clothing (2)";
    
    $gameActors.actor(b)._neededCustomUpdate = true;

    You can change any single part this way. For example, you can change Clothing to Body and it will work to change the body
    Code:
    var b= 1;
    $gameCharacterCreations._data[b].Body.file="Body (1)";
    $gameCharacterCreations._dataDd[b].Body.file="Body (1)";
    $gameCharacterCreations._dataFace[b].Body.file="Body (1)";
    $gameCharacterCreations._dataSv[b].Body.file="Body (1)";
    
    $gameActors.actor(b)._neededCustomUpdate = true;

    You can also change the color. For example, to make the clothing use the blue preset palette color
    Code:
    var b= 1;
    $gameCharacterCreations._data[b].Clothing.color=["Blue", 0, 0, 0.5, 0.5];
    $gameCharacterCreations._dataDd[b].Clothing.color=["Blue", 0, 0, 0.5, 0.5];
    $gameCharacterCreations._dataFace[b].Clothing.color=["Blue", 0, 0, 0.5, 0.5];
    $gameCharacterCreations._dataSv[b].Clothing.color=["Blue", 0, 0, 0.5, 0.5];
    $gameActors.actor(b)._neededCustomUpdate = true;
    To reset the piece of clothing back to its default colors
    Code:
    var b= 1;
    $gameCharacterCreations._data[b].Clothing.color=[0];
    $gameCharacterCreations._dataDd[b].Clothing.color=[0];
    $gameCharacterCreations._dataFace[b].Clothing.color=[0];
    $gameCharacterCreations._dataSv[b].Clothing.color=[0];
    
    $gameActors.actor(b)._neededCustomUpdate = true;
  4. AquaEcho said:
    You can force a change to clothing with the following script
    Code:
    var b= 1; //actor ID here
    $gameCharacterCreations._data[b].Clothing.file="Clothing (2)"; //put the file name in the quotes here
    $gameCharacterCreations._dataDd[b].Clothing.file="Clothing (2)";
    $gameCharacterCreations._dataFace[b].Clothing.file="Clothing (2)";
    $gameCharacterCreations._dataSv[b].Clothing.file="Clothing (2)";
    
    $gameActors.actor(b)._neededCustomUpdate = true;

    You can change any single part this way. For example, you can change Clothing to Body and it will work to change the body
    Code:
    var b= 1;
    $gameCharacterCreations._data[b].Body.file="Body (1)";
    $gameCharacterCreations._dataDd[b].Body.file="Body (1)";
    $gameCharacterCreations._dataFace[b].Body.file="Body (1)";
    $gameCharacterCreations._dataSv[b].Body.file="Body (1)";
    
    $gameActors.actor(b)._neededCustomUpdate = true;

    You can also change the color. For example, to make the clothing use the blue preset palette color
    Code:
    var b= 1;
    $gameCharacterCreations._data[b].Clothing.color=["Blue", 0, 0, 0.5, 0.5];
    $gameCharacterCreations._dataDd[b].Clothing.color=["Blue", 0, 0, 0.5, 0.5];
    $gameCharacterCreations._dataFace[b].Clothing.color=["Blue", 0, 0, 0.5, 0.5];
    $gameCharacterCreations._dataSv[b].Clothing.color=["Blue", 0, 0, 0.5, 0.5];
    $gameActors.actor(b)._neededCustomUpdate = true;
    To reset the piece of clothing back to its default colors
    Code:
    var b= 1;
    $gameCharacterCreations._data[b].Clothing.color=[0];
    $gameCharacterCreations._dataDd[b].Clothing.color=[0];
    $gameCharacterCreations._dataFace[b].Clothing.color=[0];
    $gameCharacterCreations._dataSv[b].Clothing.color=[0];
    
    $gameActors.actor(b)._neededCustomUpdate = true;


    Did you just realize an overlay for weapons and clothings "on" the original sprite as an overlay system?!
  5. gniiial said:
    Did you just realize an overlay for weapons and clothings "on" the original sprite as an overlay system?!
    Yes, I have been trying to use SRD Character Creator with MOG_CharPoses to reflect equipment changes on the characters and have made a lot of progress toward that goal (about 80 percent).

    I noticed relevant questions had gone unanswered so I answered them.
  6. AquaEcho said:
    Yes, I have been trying to use SRD Character Creator with MOG_CharPoses to reflect equipment changes on the characters and have made a lot of progress toward that goal (about 80 percent).

    I noticed relevant questions had gone unanswered so I answered them.
    I originally asked this at a yt video of yours so i'll ask it here. I have a problem related character poses of Chrono Engine and character creator EX plugin

    How do you syncronize the attack animations with the visible equipment layers?? I got the visual equipment layers to work but for some reason it disables the attack poses with the weapons. Could the problem it be related to the Body folder in the SRD plugin? I used two opcional sprites to pick for the main character in different skin colors for the body
  7. vampy_graveyard said:
    How do you syncronize the attack animations with the visible equipment layers?? I got the visual equipment layers to work but for some reason it disables the attack poses with the weapons.
    Attacks are a bit more involved because I had to edit the plugin file to create new poses for them. You can see my post above on what I had to do.
    Post in thread 'SumRndmDde's Character Creator-EX plugin: F.A.Q's' https://forums.rpgmakerweb.com/inde...r-creator-ex-plugin-f-a-qs.88746/post-1483797
  8. AquaEcho said:
    Attacks are a bit more involved because I had to edit the plugin file to create new poses for them. You can see my post above on what I had to do.
    Post in thread 'SumRndmDde's Character Creator-EX plugin: F.A.Q's' https://forums.rpgmakerweb.com/inde...r-creator-ex-plugin-f-a-qs.88746/post-1483797
    What if I want to do multiple weapons that could have different attack animations? Your posts mentions attack and dead animations but I saw nothing about different weapons with different attack animations
    If possible I want to link them with the Tool Map of Chrono Engine
  9. vampy_graveyard said:
    What if I want to do multiple weapons that could have different attack animations? Your posts mentions attack and dead animations but I saw nothing about different weapons with different attack animations
    If possible I want to link them with the Tool Map of Chrono Engine
    You repeat the process for every pose you want to add, whether they be attack, jumping, crouching, whatever. It's simply a guide on how to add new poses, whatever they are.
  10. AquaEcho said:
    You repeat the process for every pose you want to add, whether they be attack, jumping, crouching, whatever. It's simply a guide on how to add new poses, whatever they are.
    I've been working on your method and I understood the process but for some reason the animations aren't working even with touching the code. I would need your hand to assist me on this and the code. I'm a Javascript noob, by the way. I'll show you what I did
    At this code I trying doing a idle animation but I couldn't get it to work.

    code 1
    1755237021965.png

    part 2
    1755237090348.png
    And this is one of the folders (ignore the cast01 folder, it's for another animated pose that I will try later)

    I also used the code for updating the animation at a button press event on a testing map
    part 3
    1755237173630.png
  11. Did you do this part? Make a section underneath every instance of the word "dead"?

    AquaEcho said:
    Do a search for "dead" in the plugin file and every time that term comes up, you also have to make an equivalent section for your new pose.

    Does your folder have all the pieces for that pose?
  12. AquaEcho said:
    Did you do this part? Make a section underneath every instance of the word "dead"?


    Does your folder have all the pieces for that pose?
    Nope, I didn't do anything related to that pose. I thought the dead pose was optional, isn't it?
  13. You're missing the point. The point is to make a copy of every line of code SRD had to add to add the dead pose.

    If that is what code the plugin author himself has to write to add a new pose, then it follows you would also have to write a copy of that code for every new pose.
  14. AquaEcho said:
    You're missing the point. The point is to make a copy of every line of code SRD had to add to add the dead pose.

    If that is what code the plugin author himself has to write to add a new pose, then it follows you would also have to write a copy of that code for every new pose.
    I've been reading carefully the instructions in your posts and I think i understood it but it's still not working, did I do something wrong? I tried to pay attention to the folders. I managed the layers to work but the animations don't work. They only work if I don't use the character creator window or the script for putting a default outfit for the character (Basically they work as long as I do nothing related to the character creator plugin)
    Keep in mind I would like to somehow link the chrono engine tool map poses with this method so they can work together

    Here is my code, I also added sections with the buildBitmap poses but I don't find it neccesary to show these for now. I also tried adding script command for the animations in the Tool Map of chrono engine but it wasn't even able to add the weapon animation
    Basically no animations are working besides the walking sprite that repeats itself even if the character is idle, something strange too.

    code
    1755325535756.png
  15. Does running this script change the actor's sprite to the new pose?
    AquaEcho said:
    To change your custom character to the new pose use the following scripts:
    View attachment 323970
    Where 1 is the actor number. If you want to change back to the normal walking sprite change true to false in the first line.
  16. AquaEcho said:
    Does running this script change the actor's sprite to the new pose
    Doesn't work for me, i tried that rn with the idle animation. Specifically with a button press event on a testing map. Should I try with a common event instead?
  17. vampy_graveyard said:
    Doesn't work for me, i tried that rn with the idle animation. Specifically with a button press event on a testing map. Should I try with a common event instead?
    No, that wouldn't make a difference. Could you press F8 or F12 to bring up the console log and see if there are any errors there?
  18. AquaEcho said:
    No, that wouldn't make a difference. Could you press F8 or F12 to bring up the console log and see if there are any errors there?
    Here you have
    console
    1755327528845.png
  19. It looks like you're trying to create two custom characters at a time because it's adding character creation info twice, first under actor id 1 then actor id 0.
  20. AquaEcho said:
    It looks like you're trying to create two custom characters at a time because it's adding character creation info twice, first under actor id 1 then actor id 0.
    I just noticed I made a mistake at my other post but I got that fixed however the animation isn't working.
    What happened before is that I made a event creating a default outfit for the character and the actor id wasn't matching the actor id in the update event for the animation.
    I got the default outfit event erased then opened the character creation window but still have no luck. However I saw a big difference in the console. It's a lot more cleaner now.
    How do I fix this?
    console 2
    1755328668901.png