By Felix Trapper
Introduction
RPG Maker VX Ace has an entire tileset dedicated to Water tiles. This, of course, is the "A1" tileset. You may have felt that the default RTP water is lacking. Perhaps it's too square, perhaps you don't like how it's opaque, etc.
In fact, you may have grown up playing such gems as FF6 where the water effects were downright awesome.

Something like this would be impossible using the default tilesets. You can't magically make them translucent, or put sunken houses underneath them, and make the water curve. But there is a fix!
You will need:
- A graphics editor (paint shop, paint.net, etc.) that supports transparency
- At least a minimal working knowledge of that editor
- Patience
You will NOT need:
- Lots of time
- Great pixel art skills
1 - Find your water base tiles
Spoiler
Every game needs them. These are the 3 tiles that make up the core of your animated water. In this tutorial, we are gonna take the base tiles directly from the RTP, to show you how it's possible to change the RTP water easily.

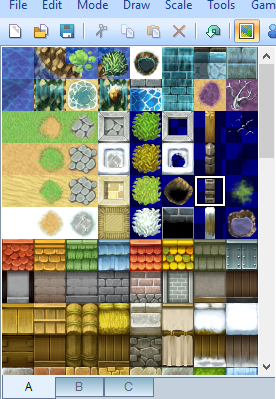
Check this out: I opened up World_A1 from the RTP tilesets. Then, I set up a grid in my editor to divide the image into 16x16 squares (a normal tile is 32x32 in game). The three
yellow squares
are the base water tiles. Grab these three tiles and put them on a new sheet.

Good. Now, this next step is optional but I do recommend it. Right now, the water still looks kinda bland. We want there to be more
contrast
between the "white water" and the rest. In your graphics program, find where you can adjust the contrast, and do so thusly:

You'll notice the water looks a bit easier to distinguish between the crests and the troughs. Alright, we are done with the first step.
Check this out: I opened up World_A1 from the RTP tilesets. Then, I set up a grid in my editor to divide the image into 16x16 squares (a normal tile is 32x32 in game). The three
yellow squares
are the base water tiles. Grab these three tiles and put them on a new sheet.
Good. Now, this next step is optional but I do recommend it. Right now, the water still looks kinda bland. We want there to be more
contrast
between the "white water" and the rest. In your graphics program, find where you can adjust the contrast, and do so thusly:
You'll notice the water looks a bit easier to distinguish between the crests and the troughs. Alright, we are done with the first step.
2 - Making a cliff base
Spoiler
Look back at the first picture from FF6. The water needs some sort of cliff or background tile to be placed upon to give it realistic depth. Again, we are going to pull from the RTP. I'm gonna do a little more in each picture while showing a little less, so do try and read between the images!

See what I've done? I've taken the cliffs from the RTP, used the grid to slice them into 16x16 sections.

Now, I've taken those 16x16 sections and made a base for my cliffs. I have a flat (front) section, and 2 side (diagonal) sections. Notice the ground is not grass--it is dirt/mud. Underwater, you will not see green grass! It looks bad. Use dirt. I also made my own shadow. Remember that the default RMVX shadow is pure black (0,0,0) set to 50% opacity. Got it? Good.
See what I've done? I've taken the cliffs from the RTP, used the grid to slice them into 16x16 sections.
Now, I've taken those 16x16 sections and made a base for my cliffs. I have a flat (front) section, and 2 side (diagonal) sections. Notice the ground is not grass--it is dirt/mud. Underwater, you will not see green grass! It looks bad. Use dirt. I also made my own shadow. Remember that the default RMVX shadow is pure black (0,0,0) set to 50% opacity. Got it? Good.
Spoiler
Now that we have the water base and the cliff base, it's time to mix them together. Start a new, large image and paste the ground base in 3 sections.

Now we are gonna put the water on. If possible, paste the water on another layer. If you are comfortable working in layers, this will help a lot. If not, or you don't know how, just paste the water and then set its opacity to about 67% (look up a tutorial on your respective graphics editor for this)
Once you do this, you can start dragging and pasting water base tile A (the first of the three) onto cliff base A.

Go back over this step and analyze the picture(s) a couple times if you got lost.
Now you are going to take one of each water tile, A B and C, and paste them again, side by side below.

We are now going to make the diagonal water tiles so it looks like the water follows the form of the cliffs!
Zoom in on those 3 water tiles you just pasted. Using the eraser tool, you are going to cut the tile diagonally in half. Try and set the "hardness" of your eraser to 50% and the size to about 4-5 pixels. This will give the edge of the water a cleaner effect.

Important: Always make sure the top left and bottom rightmost pixel are water, and likewise, cut it as close as you can to that pixel. This will make the water appear more seamless. Do it for the other two tiles, adding a little variation to each one.

It's coming along nicely. Now, we want the water to become 'whiter' when it crashes against the cliffs. This gives the water and edge, and contrasts it between the rocks. To do this, find your "lighten/darken" tool. We want to lighten the edge of the water. Adjust the strength of the effect to your liking. Ideally, it should come out looking something like this:

Ta-da! We now have reasonable looking water edges. Now, you are going to do the same thing for the other diagonal direction, and also the front side. For the front, you want the tile to be almost empty with just 1-5 pixels of water fluctuating at the bottom border.
When you have all the tiles, add them to the ground base. The leftmost water tile would go on the leftmost ground base, the middle on the middle, and so on.
You should get something like this:

Coming along nicely! I admittedly hurried through this part and could have made them a lot nicer. For your game, you will take plenty of time perfecting the look.
As a bonus, if you took the "paste the water on a new layer" recommendation I made earlier, you can now freely adjust the water's opacity to suit your liking. You can also use a hue shifting tool to make it more/less blue. If you pasted it all on one layer, your options are limited.
Now we are gonna put the water on. If possible, paste the water on another layer. If you are comfortable working in layers, this will help a lot. If not, or you don't know how, just paste the water and then set its opacity to about 67% (look up a tutorial on your respective graphics editor for this)
Once you do this, you can start dragging and pasting water base tile A (the first of the three) onto cliff base A.
Go back over this step and analyze the picture(s) a couple times if you got lost.
Now you are going to take one of each water tile, A B and C, and paste them again, side by side below.
We are now going to make the diagonal water tiles so it looks like the water follows the form of the cliffs!
Zoom in on those 3 water tiles you just pasted. Using the eraser tool, you are going to cut the tile diagonally in half. Try and set the "hardness" of your eraser to 50% and the size to about 4-5 pixels. This will give the edge of the water a cleaner effect.
Important: Always make sure the top left and bottom rightmost pixel are water, and likewise, cut it as close as you can to that pixel. This will make the water appear more seamless. Do it for the other two tiles, adding a little variation to each one.
It's coming along nicely. Now, we want the water to become 'whiter' when it crashes against the cliffs. This gives the water and edge, and contrasts it between the rocks. To do this, find your "lighten/darken" tool. We want to lighten the edge of the water. Adjust the strength of the effect to your liking. Ideally, it should come out looking something like this:
Ta-da! We now have reasonable looking water edges. Now, you are going to do the same thing for the other diagonal direction, and also the front side. For the front, you want the tile to be almost empty with just 1-5 pixels of water fluctuating at the bottom border.
When you have all the tiles, add them to the ground base. The leftmost water tile would go on the leftmost ground base, the middle on the middle, and so on.
You should get something like this:
Coming along nicely! I admittedly hurried through this part and could have made them a lot nicer. For your game, you will take plenty of time perfecting the look.
As a bonus, if you took the "paste the water on a new layer" recommendation I made earlier, you can now freely adjust the water's opacity to suit your liking. You can also use a hue shifting tool to make it more/less blue. If you pasted it all on one layer, your options are limited.
Spoiler
Now it's time to make these useful. We want to put all these water tiles into a format VX recognizes. Let's start by deleting the redundant tiles or the tiles that aren't used with water. This is what is left:

Notice how each tile above is unique. Now, we are going to group these into blocks of 2x3 tiles to fit into the water tileset. Remember, a normal water tileset piece looks like this:


Notice how each tile above is unique. Now, we are going to group these into blocks of 2x3 tiles to fit into the water tileset. Remember, a normal water tileset piece looks like this:
Notice there are 6 main tiles that make up the water. So, arrange your water tiles like this. It will look like a mess at first.
I like to group mine in similar sections. you can do it how you please, it doesn't make a huge difference.
Now, lets paste these into a water tileset for use.
Fits very snugly. Great. Now just save this as a new file, and put it in your project. Optional steps include pasting the dry ground diagonal tiles you made in an A5 tileset. You will see this in the final product.
5 - Finally, use the water in the RPG Maker editor!
Spoiler
Now we can finally see how it works! Import the tileset and start a new map. Using the water tiles, make several different 2x2 blocks of water. Notice each unique tile is being displayed. To get the upper-right tile to show, you need to make a 4 way intersection. The middle intersection piece will become the top-right tile.

Now we get to test your wicked shift-clicking abilities! Surely you know about shift-clicking, right? That's where you hold shift, right-click copy a tile, then while still holding shift, you can paste that exact tile without worrying about Mr. Autotile messing things up!
Go ahead and shift-click to your hearts content!
Add a sunburst effect (because what would an RPG Maker game be without SUNLIGHT EFFECTS?) and suddenly you have a bona fide map with water that looks a lot better than normal! And you don't even have to pester some dude about using them in your game because you made them yourself from materials you own a license to! *high five*
Check out this video to see the water in action!
Optional The default water animation speed in VX(Ace) is kind of slow. Formar supplied me with a fun little script that lets you customize the speed. check it out!
class Spriteset_Map
#--------------------------------------------------------------------------
# * Update Tilemap
#--------------------------------------------------------------------------
alias speedup_update_tilemap update_tilemap
def update_tilemap
speedup_update_tilemap
# 1 will double the speed
# 2 will triple the speed
# 3 will quad...
2.times do
@tilemap.update
end
end
end
Code: