Auto-Tiles in Tiled : Parallax Mapping made easier

● ARCHIVED · READ-ONLY
Started by Deldel 42 posts Page 2 of 3 View original ↗
  1. Eliaquim said:
    No luck for me :(
    Tried using your example too, but can't make it work.
    I guess I will do my mapping like the A5 tiles.
    Thanks for trying to help! ^^
    Could you send me the autotiles you tried it with? Maybe I can help you with it ^-^
    Tea's Jams said:
    You de man @Deldel : D
    Thank you XD

    Eliaquim said:
    I will give it a try!! Thanks for the reply.
    I tried to resize the tiles before but didn't work xD
    I will try your method!

    Oh I didn't merely resize them, I edited em out! Maybe that's where you went wrong?
  2. Deldel said:
    Could you send me the autotiles you tried it with? Maybe I can help you with it ^-^
    Thank you XD
    Oh I didn't merely resize them, I edited em out! Maybe that's where you went wrong?
    The resize didn't work, but that was before you give your last tip! ^^
    Here is what I'm trying to do.
    tHP80li.png
  3. Deldel said:
    Hi!
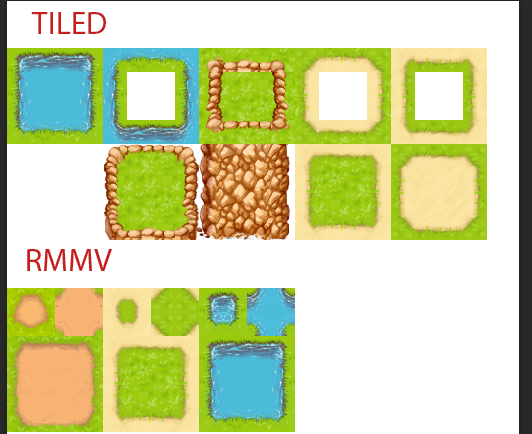
    This is a short tutorial to show you how to work with RPG Maker's autotiles in Tiled to make pre-rendering mapping easier. If you do not know what Tiled is, it's a program that allows you to create maps with Tilesets (like RPG Maker) but with the added bonus of an unlimited number of layers, unlimited tilesets per map and the possibility to extract multiple PNGs from your map so that you can edit its lighting in photoshop (if you want to) among other things.

    Pre-requesits:
    1. Softwares: a graphic editor (Photoshop, gimp or whatever); Tiled, RPG Maker XP/VX/Ace/MV.
    2. A basic understanding of Tiled mapping: There's an excellent guide right here in these forums! Click here to read it then come back to know more about using auto-tiles with it! :D
    3. A basic understanding of a graphic editor (Photoshop or gimp) : All you need to know is how to create a grid and copy/paste. If you already have the autotiles in Tiled format, there's no need to edit the images.
    4. And that's all!
    Part 1 :Making the autotiles compatibles with Tiled:
    If you have already made -compatile auto tiles, skip to part 2

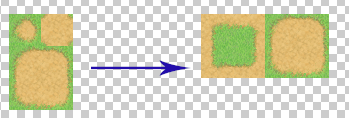
    This is really easy, and once you know how to do it it will only take a few minutes to transform a VX/XP/MV autotiles to a Tiled one. The hardest part is figuring out where to put each part but I already figured out that for you :p
    I will be working with this set of autotiles from VX Ace:
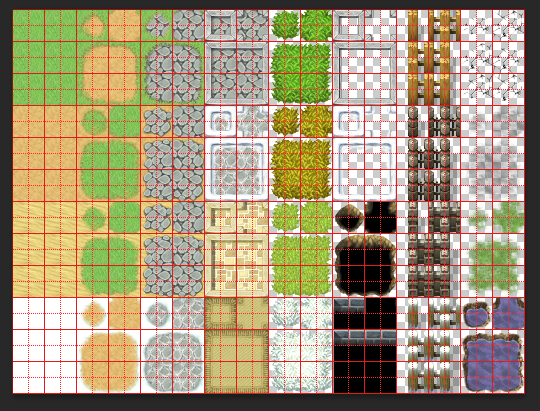
    7991748d3b77d58225a93b4a195eabaf.png
    Outside A2- RPG Maker VX Ace​

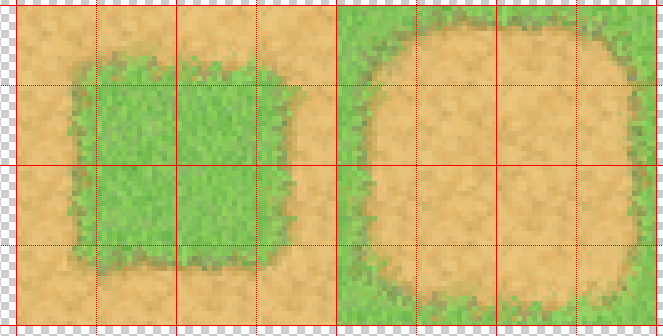
    Note the Guides, I advise you to make a grid of 32px with 2 subdivisions. If you are using RMMV, that will be 48px :D
    For this tutorial, we will be transforming the second autotile : The grass -> dirt one.
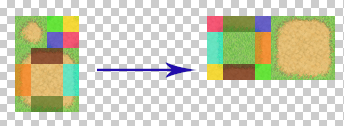
    Here's the template I made:
    64906cb81e3a8aa8c0fa58a5c1ab19e2.png 8ac3f58d785bdf8c5bf4ca9b3589c2ff.png
    Note that the main part of the autotile works perfectly as is! As for the corners, it uses a 2x2 grid. It might sound complicated but simply watch the images and the color coded template. There's nothing complicated here, just moving around parts of the default autotile to make a new one.
    If it's still not clear, don't hesitate to ask questions. I might make a quick video to explain this even more visually.
    End result:
    5512176dc00e4e8176751e5251c7430e.png
    Part 2 : Import to tiled and setup
    First of all, import your Tileset into Tiled. Import it as a 16x16 tileset (or 24x24px for RMMV). This is explained in the basic tutorial so you should know how to do it.
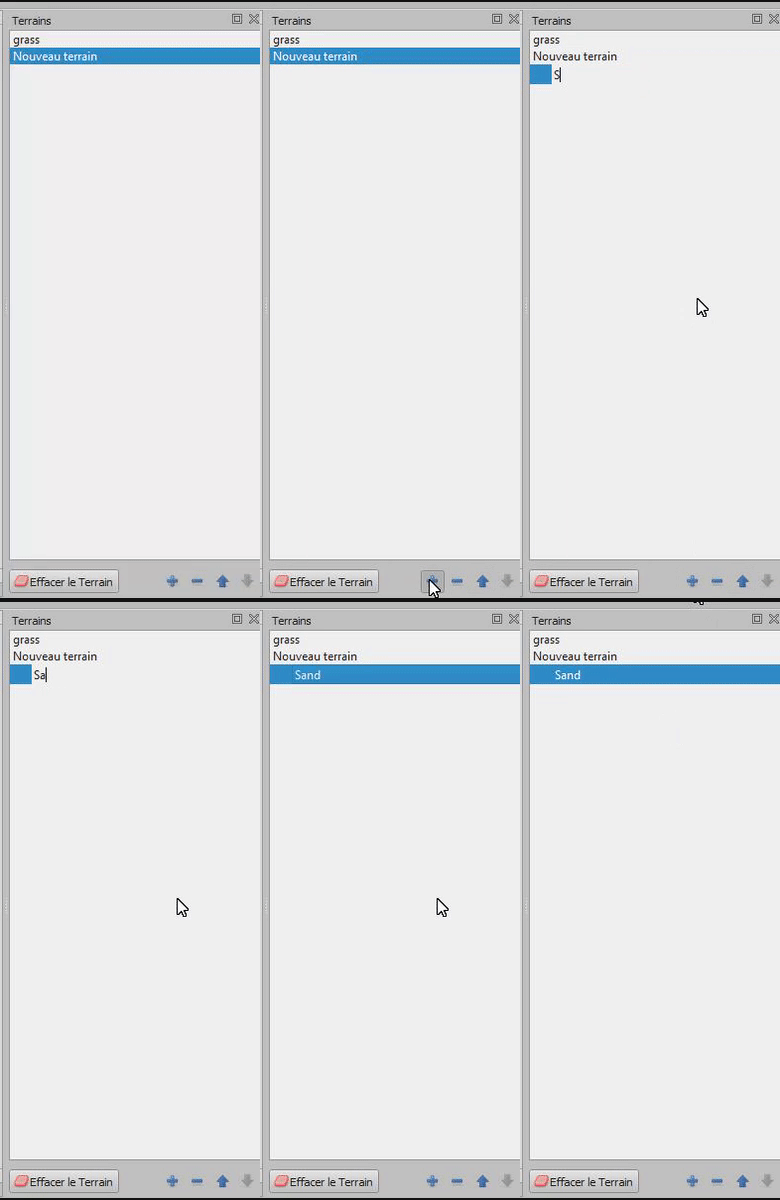
    To make the autotile act like one, click on the 'terrains' icon and click on 'new terrain':
    152114fadd97169a0cba9095ae4f505e.png : Terrain icon
    321c1d0e44ab8b552732693cb76ad92e.gif
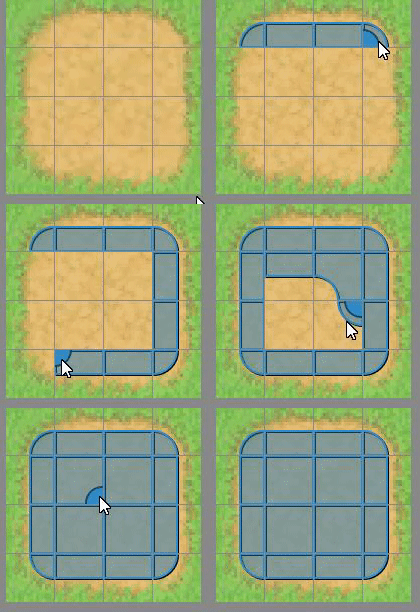
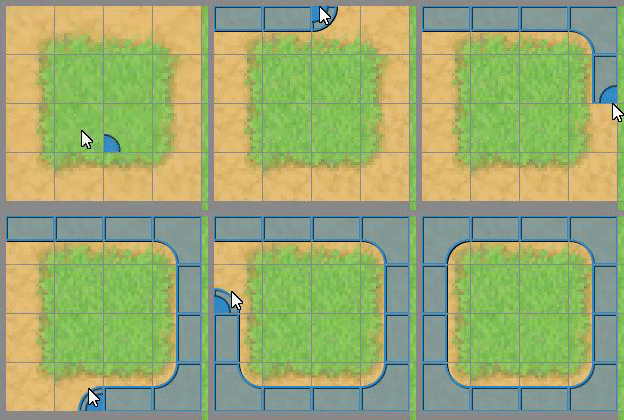
    You are now in terrain mode. You should see small blue corners when you hover over your tileset. To set up the tilesets, simply click in this way (it's easier to demonstrate than to explain lol):
    a5f62cd3584cebe9ea6535efce40a7fb.gif 353e23f33dc0d08e286ad5aa14e752d9.gif
    Note that I did NOT click on the middle of the corner tiles. Truth be told, the grass tiles in the middle is not necessary at all, but I thought the Tileset looked prettier with it ahah.
    And now ... You're done! It was that easy :D

    Here's how it works in real time:
    f405d7188fb345615293f26a2b46750d.gif
    You might notice that the path on the left is slightly larger. That is because by default, Tiled uses the whole autotile to draw (yes, the whole 64x64px). To draw a smaller path (RM's default 32px) simply hold CTRL while drawing the paths :D

    Also, to avoid weird terrains collisions, follow this simple advices:
    • Create a new layer when you want to use an autotile.
    • Put all your autotiles in the same tileset (Like Rpg maker does), this advice is from Tiled's documentation. I did work with multiple autotiles tilesets and never had any problem, but I'm saying this anyway in case it causes a problem for you :D
    And here are some of my own Tileset for RMMV transformed for Tiled, so you have a better idea:
    625ca1cd921c32dabd794e9db3a3d3b7.png
    Voilà! I hope you find this useful ♥
    DelDel

    Do you know how to make this work if you're using 16x16 tile maps? I'm trying to make a usable terrain out of this autotile in Tiled, tried all your examples, none of them really work. Tried converting it to 32x32, didn't work. Would love suggestions
  4. @Bridgeman You would still want your grid half size, so 8 in this case.

    @Eliaquim I know it's been a while but you would need to select 24 for all your tiles. This means that objects and such will just need to be mapped as a group of tiles, rather than one 48x48 tile, or whatever. Then, when you export your map and use it in MV, it will still work with the 48 grid.
  5. mlogan said:
    @Bridgeman You would still want your grid half size, so 8 in this case.

    @Eliaquim I know it's been a while but you would need to select 24 for all your tiles. This means that objects and such will just need to be mapped as a group of tiles, rather than one 48x48 tile, or whatever. Then, when you export your map and use it in MV, it will still work with the 48 grid.

    But the rest of my tileset is 16x16 as well, so wouldn't that be a problem? Or maybe I'm misunderstanding you. If I make the terrain tile 8x8, I have to make everything 8x8 right?
  6. No, you still map it. Your items will just be in pieces, so you will have to select multiple tiles at once for an object. But the smaller grid will allow you to be able to map more precisely. And when you export your map and put it into the engine you are using, the grid will still be the default of the maker.
  7. Yep, that works... Can't believe I didn't think of that. Thank you.
  8. I don't know if this is the right thread to pust, but.. I found this https://github.com/AscensionGameDev/VX-Autotile-Tiled-Terrain-Converter
    which is inspired by this topic, however, I don't know how to run it. There's no .exe or anything. How can I get it to work? It seems a lot less time consuming (and prone to mistakes) than editting all my autotiles by hand.
  9. BCj said:
    I don't know if this is the right thread to pust, but.. I found this https://github.com/AscensionGameDev/VX-Autotile-Tiled-Terrain-Converter
    which is inspired by this topic, however, I don't know how to run it. There's no .exe or anything. How can I get it to work? It seems a lot less time consuming (and prone to mistakes) than editting all my autotiles by hand.
    Hello!
    I'm on my phone, so I haven't tried it. But I did download the software and there seems to be a PDF and an .exe bundled in a zip file, I think you downloaded the source code.
    Release Version 1.1 Release · AscensionGameDev/VX-Autotile-Tiled-Terrain-Converter Download the first file, which is a ZIP, NOT the source code.
    And Thank you for sharing this little piece of software, I'll check it out later!
  10. Thanks! I'll fiddle with it.
    I am running into a problem though, I converted one tileset piece via this tutorial. Made a new tileset in tiled, did the whole terrain tag thing, but I can't draw with it in a new map, even though I imported the tileset. I literally have no clue how to get it to work.
  11. BCj said:
    Thanks! I'll fiddle with it.
    I am running into a problem though, I converted one tileset piece via this tutorial. Made a new tileset in tiled, did the whole terrain tag thing, but I can't draw with it in a new map, even though I imported the tileset. I literally have no clue how to get it to work.
    This tutorial is about making RM's autotiles compatible with Tiled. I did not delve into the workings of Tiled as to not make this tutorial unnecessarily cluttered. I advise you to read up about the basics of Tiled to get everything working correctly (it's pretty straightforward Dont' worry)
    Here's a tutorial about Tiled : https://forums.rpgmakerweb.com/index.php?threads/introductory-guide-to-tiled.3331/
  12. I can get the normal things working in tiled just fine.
    I just don't know how to import/draw with the terraintags, and when I followed the tutorial a few days ago, I didn't find anything about terrain stuff. Could you make a short tutorial how to get that to work?
  13. BCj said:
    I can get the normal things working in tiled just fine.
    I just don't know how to import/draw with the terraintags, and when I followed the tutorial a few days ago, I didn't find anything about terrain stuff. Could you make a short tutorial how to get that to work?
    I'll take a few screenshots when I get on PC :D
  14. Thank you :D
    The .exe works wonderfully by the way! Thanks for finding it for me.
  15. Are we rearranging the base file or pasting tiles into a new one?
  16. In 24x24 grid you can use this terrain tagging on normal(not converted tilesets)

    A terrain:
    2.png

    and have same outcome as this tagging on converted tilesets

    B terrain:
    1.png


    this is outcome
    3.png

    useful if you are lazy to convert :)
  17. hello, thank you for this info, you are appreciated. i need help, i can't get this tileset to work in tiled, can any help please, its an mv tile set,
  18. Hello!

    i have a question, how can i change the selection of these colors?

    I see in your images, that are like "2x2" squares when painting the corners, but i try on my tiles, and they are like "3x3" squares, just like in the image:


    1608040537881.png

    And im still so confused, im working in 8x8 tiles, and there is no way i cannot create autotiles working and i tried several times
  19. Friend bought some tilesets she wanted to use in Tiled, and I created a quick Python script to convert based on the info in this topic:


    Should work with files looking like the one in first post ('Outside A2- RPG Maker VX Ace'). Only saw the C# project mentioned here later but who knows maybe this is useful for someone :)
  20. xAiluros said:
    Friend bought some tilesets she wanted to use in Tiled, and I created a quick Python script to convert based on the info in this topic:
    [embedded media]

    Should work with files looking like the one in first post ('Outside A2- RPG Maker VX Ace'). Only saw the C# project mentioned here later but who knows maybe this is useful for someone :)

    How do you run this?