State Stages
Stacking States Improved
Stacking States Improved
This script allows states to be applied in controlled stages or levels. Basically, when a state is applied multiple times to a battler, instead of resetting the state or stacking another on time of it, the state will ‘advance’ to the next predefined state within an array of states. States may also be defined as positive, negative, or neutral, allowing for additional interactions when states are applied to battlers. State stacking simply cannot compare to the flexibility to state stages.
FEATURES
- Performance Friendly. Staging setup happens during database creation.
- States can operate similar to buffs in RPG Maker.
- States can be categorized as positive, negative, neutral, or custom types. Allowing for easy removal.
- Staging States can be setup with note tags, saving time and database space.
- Multi-Staging (advancing two or more states) has been integrated into the UI. No script calls needed.
- Custom state abbreviations and staging numbers can be displayed on state icons.
HOW IT WORKS
Positive States: State 1(ATK * 150%), State 2(ATK * 200%), State 3(ATK * 250%)
Negative States: State 4(ATK * 67%), State 5(ATK * 50%), State 6(ATK * 40%)
The above represents an entire staging hash. There are six states total, 3 within a positive array, and 3 within the negative array. Below is an example of how this appears within the code.
The ATK staging hash has 3 positive states and 3 negative states.
Below is an example of how these states interact in order of events.
Negative States: State 4(ATK * 67%), State 5(ATK * 50%), State 6(ATK * 40%)
The above represents an entire staging hash. There are six states total, 3 within a positive array, and 3 within the negative array. Below is an example of how this appears within the code.
Code:
:ATK => {:pos => [1, 2, 3], :neg => [4, 5, 6]},The ATK staging hash has 3 positive states and 3 negative states.
Below is an example of how these states interact in order of events.
- State 1 is added. The battler gains state 1(ATK * 150%)
- State 1 is added. The battler gains state 2(ATK * 200%) – State 1 is removed.
- State 4 is added. The battler gains state 1(ATK * 150%) – State 2 is removed.
- State 4 is added. State 1 is removed.
- State 4 is added. The battler gains state 4(ATK * 67%)
- State 4 is added. The battler gains state 5(ATK * 50%) – State 4 is removed.
- State 1 is added x2. State 5 is removed.
- State 1 is added x2. The battler gains state 2(ATK * 200%)
- State 4 is added x3. The battler gains state 4(ATK * 150%) – State 2 is removed.
After the reading the above example, you may have noticed a potential inconvenience. The above state staging example required 6 individual states to setup. While this is a perfectly feasible way of utilizing the script, there is an alternative setup with notetags. Using a database state as a template, this script can create virtual states to populate the staging hash. This will save a lot of database space while retaining all of the script’s functionality. Here’s how it works:
We add State 1 to the database.
We’ll call it Attack +1 and give it the [ATK] * 150% feature.
First, we’ll add two additional features to the list. [ATK] * 200%, and [ATK] * 250%. Then we move on to the state’s notes:
And just like that, we have the same positive staging from above without creating additional entries within the database. We may take this a step further and make some additional changes.
Adding negative states to the above ATK staging requires us to create another state within the database to serve as a template. We’ll use state 4 and name it Attack -1, giving it the [ATK] * 67% feature.
First, we’ll add two additional features to the list. [ATK] * 50, and [ATK] * 40%.
We’ve successfully added negative staging to the ATK state stage. Using this method required only two database slots as opposed to six.
We add State 1 to the database.
We’ll call it Attack +1 and give it the [ATK] * 150% feature.
First, we’ll add two additional features to the list. [ATK] * 200%, and [ATK] * 250%. Then we move on to the state’s notes:
Code:
Tells the script that this state is the first positive state within the ATK stage. This notetag add this state to the existing staging hash or create a new one if ATK doesn't already exist.<Stage: ATK, pos, 1>Code:
Creates a copy of this state and takes the second feature in the list. The second feature in the list will no longer apply to this state.<Index: 2, Copy 0, Take: 2>Code:
Creates a copy of this state and takes the third feature in the list. The third feature will no longer apply to this state.<Index: 3, Copy 0, Take: 3>And just like that, we have the same positive staging from above without creating additional entries within the database. We may take this a step further and make some additional changes.
Code:
Changes the name of the second positive state to Attack +2.<Adj_State: 2, name: Attack +2>Code:
Changes the name of the third positive state to Attack +3.<Adj_State: 3, name: Attack +3>Code:
Changes the icon of the third positive state to ID 74.<Adj_State: 3, icon: 74>Adding negative states to the above ATK staging requires us to create another state within the database to serve as a template. We’ll use state 4 and name it Attack -1, giving it the [ATK] * 67% feature.
First, we’ll add two additional features to the list. [ATK] * 50, and [ATK] * 40%.
Code:
Tells the script that this is the first negative state within the ATK stage. The ATK stage should already exist at this point, so we're adding a negative stage here.<Stage: ATK, neg, 1>Code:
<Index: 2, Copy 0, Take: 2>Code:
<Index: 3, Copy 0, Take: 3>We’ve successfully added negative staging to the ATK state stage. Using this method required only two database slots as opposed to six.
EXAMPLE SETUP
In this example, we’re going to link the Stun and Paralysis states so that being stunned while already stunned, inflicts the dreaded paralysis status effect. There’s a couple of ways to approach this with State Stages, so we’ll delve a bit into both. First we’re going to combine the states into a stage using the Staging States Hash within the script’s settings.
We’ll name this stage STN, short for ‘stun’ and add the state IDs as a negative type. A quick peek at the database reveals that the ID for Stun is 8, and the ID for Paralysis is 7. When using the Staging Hash, ID should always be placed from left to right, good to best, bad to worst.
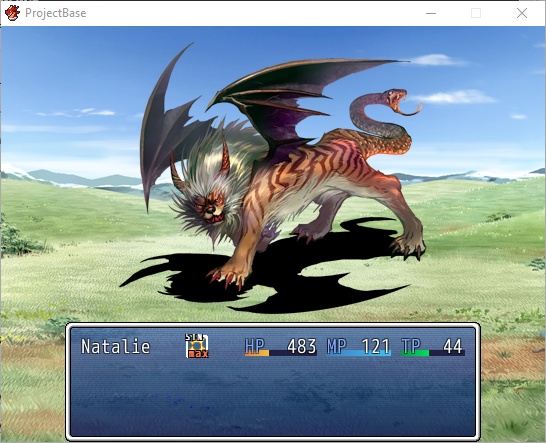
If you can believe it, we’ve already accomplished our goal. Due to the way staging works, when our actor is paralyzed, directly or through multiple stuns, we’ll get a display like this.
Now, what if we wanted staging to continue? Let’s say that the effects of paralysis can actually get worse. Let’s add another two states to the staging, one will be called Petrified, which act as a longer lasting paralyze, and the final state will be Frozen, which lasts forever unless removed. We could approach this by creating said states within the database and link them to the STN stage me made earlier, or… we can use notetags.
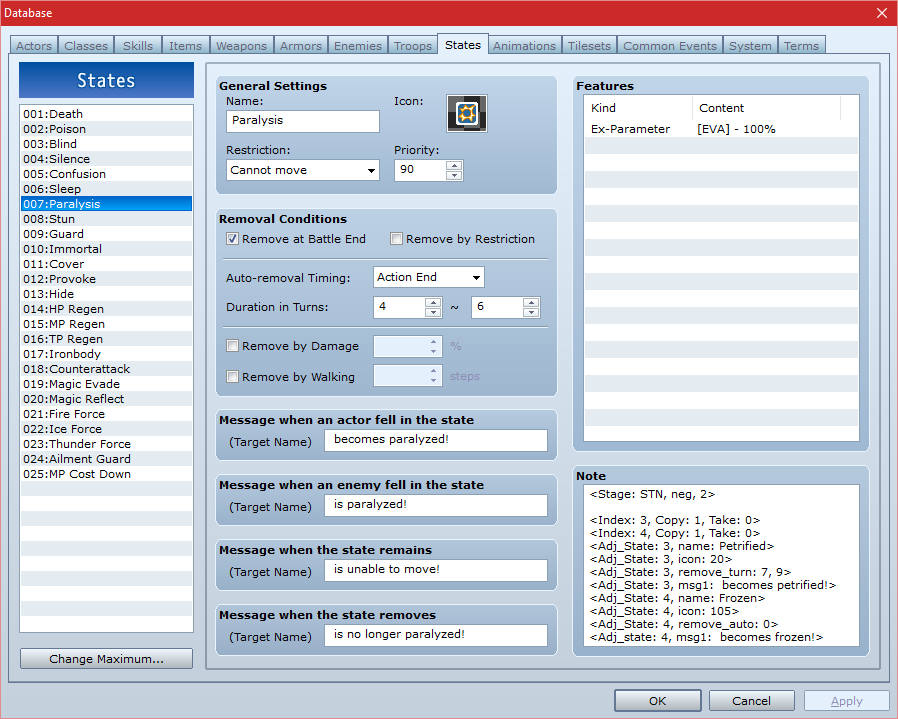
Alright, let’s walk through this notetag setup. On the very first line is the most important notetag, it must be included when creating states this way. It basically creates a new staging hash OR simply references a staging hash that already exists. We’ve done the latter hear and it’s important not to make any mistakes. STN is the name we gave our staging hash previously, and neg is the type that states were put under. The 2, is the index number, meaning ‘the second state within the stage’, in this case our second state is ID 7, the Paralysis state that’s in the screenshot. We have correctly referenced this stage, it’s a good idea to turn the Debugger option on when setting up stages this way, just in case.
<Index: 3, Copy: 1, Take: 0> and <Index: 4, Copy: 1, Take: 0> are the notetags used to create entirely new states based on a parent state. In this case, the parent state is Paralysis shown above. With this, all of the data from this state is duplicated and added to a new state with a different state ID. That state ID is then added to the staging hash based on the index; 3 and 4 in this case. Keep in mind that Stun is under index 1, and Paralysis is under index 2. The Copy and Take portions of the notetag refer to the Features lists of this Paralysis state. Copy: 1 means that the first feature (the only feature shown) will be copied over to the new state. If we were to set Take: to 1, then the feature would be copied to the new state and removed from this Paralysis state.
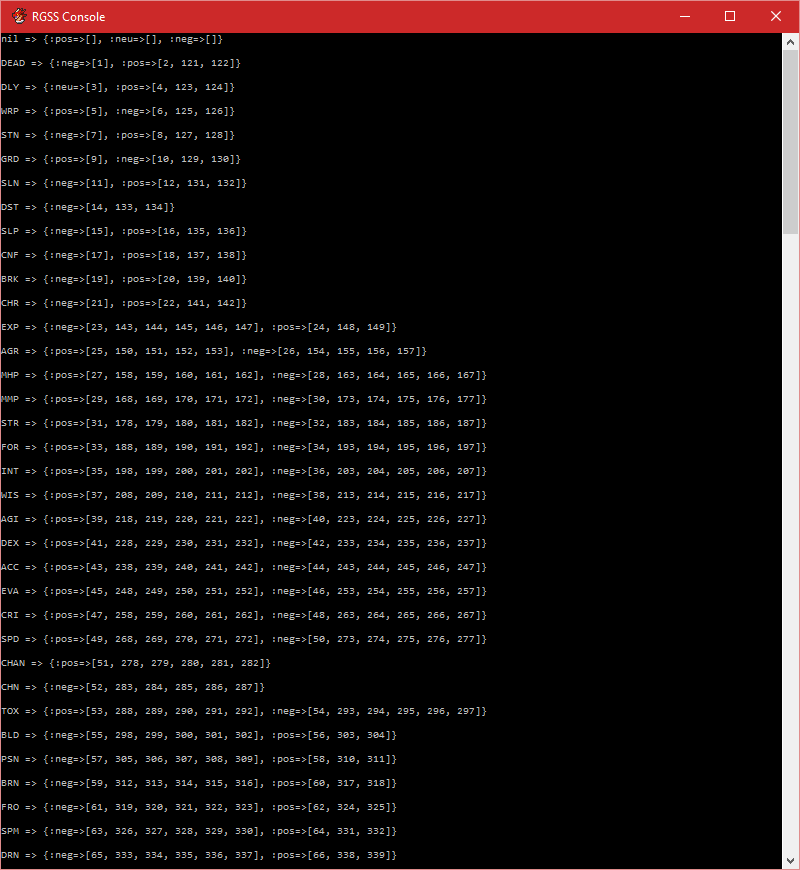
The <Adj_State> notetags are used to modify the newly created states. In the example above, we change the names, icon indexes, state removal turns, and the ‘Message when an actor fell in the state’ values. This is important for differentiating one stage from another. Before we do a test battle, let’s activate the Debugger and see what our staging hash looks like.

As you can see, our stage now includes two additional state IDs. Note that the ID numbers will always be outside of the maximum range of your state database. Since the maximum (seen in the example above) was 25, states created by notetags would begin at 26 and continue from there. If you’ve attempted something like this and ended up with an entirely new staging hash… something went wrong. Anyway, let’s see how this look in-game. Since state icons are only displayed for actors by default, I had an ogre beat-up on Natalie until I got the shots I needed. >_>
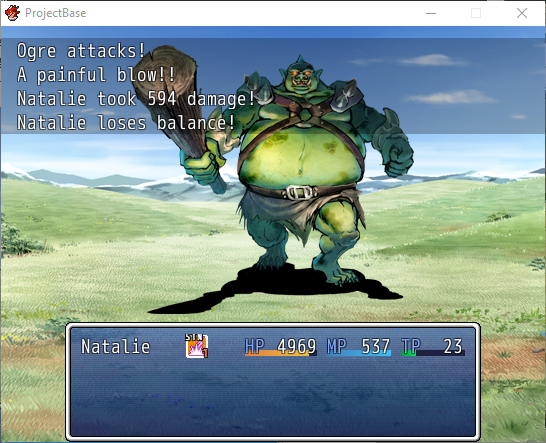
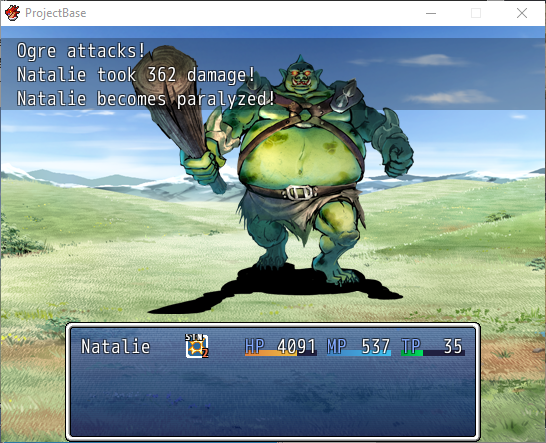
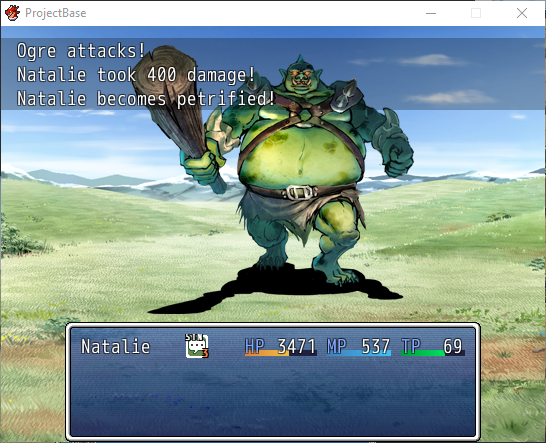
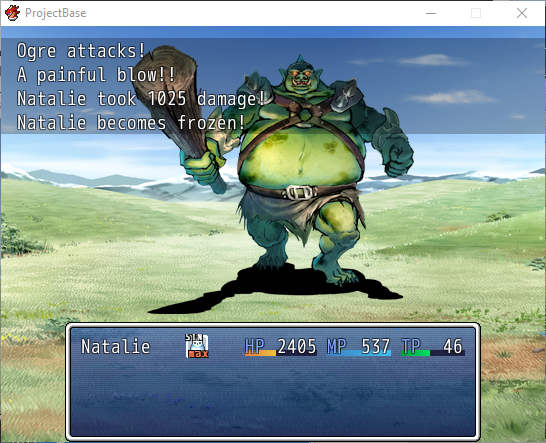
That covers the basics. More detailed instructions can be found within the script’s header. I’ll stress once again that developers should make full use of the debugger option within the script’s settings while working on staging. Here’s an example of many staging states within a project. Enjoy!
Code:
    #======================================================================
    # >> Staging States Hash
    # ---------------------------------------------------------------------
    # As of version 3.0, it is no longer required to set up state stages
    # using this hash, however, it can still be used along side notetags
    # for those upgrading from a previous version.
    #-
    # name => {:pos => [positive effect IDs], :neg => [negative effect IDs]}
    #-
    # name        - Can be any integer, string, or symbol.
    # :pos IDs    - The positive effect IDs of the states in your database.
    # :neg IDs    - The negative effect IDs of the states in your database.
    #-
    # You may exclude :pos or :neg from the hash if you so choose.
    # You may also use :neu to indicate that the state is neither good or bad.
    #======================================================================
      States = { # Do Not Edit This Line

        :nil => {:pos => [], :neu => [], :neg => []}, # Copy/Paste

      } # Do Not Edit This Line
We’ll name this stage STN, short for ‘stun’ and add the state IDs as a negative type. A quick peek at the database reveals that the ID for Stun is 8, and the ID for Paralysis is 7. When using the Staging Hash, ID should always be placed from left to right, good to best, bad to worst.
Code:
    #======================================================================
    # >> Staging States Hash
    # ---------------------------------------------------------------------
    # As of version 3.0, it is no longer required to set up state stages
    # using this hash, however, it can still be used along side notetags
    # for those upgrading from a previous version.
    #-
    # name => {:pos => [positive effect IDs], :neg => [negative effect IDs]}
    #-
    # name        - Can be any integer, string, or symbol.
    # :pos IDs    - The positive effect IDs of the states in your database.
    # :neg IDs    - The negative effect IDs of the states in your database.
    #-
    # You may exclude :pos or :neg from the hash if you so choose.
    # You may also use :neu to indicate that the state is neither good or bad.
    #======================================================================
      States = { # Do Not Edit This Line

        :nil => {:pos => [], :neu => [], :neg => []}, # Copy/Paste
        :STN => {:neg => [8, 7]}, # Stun to Paralysis

      } # Do Not Edit This Line
If you can believe it, we’ve already accomplished our goal. Due to the way staging works, when our actor is paralyzed, directly or through multiple stuns, we’ll get a display like this.
Now, what if we wanted staging to continue? Let’s say that the effects of paralysis can actually get worse. Let’s add another two states to the staging, one will be called Petrified, which act as a longer lasting paralyze, and the final state will be Frozen, which lasts forever unless removed. We could approach this by creating said states within the database and link them to the STN stage me made earlier, or… we can use notetags.
Alright, let’s walk through this notetag setup. On the very first line is the most important notetag, it must be included when creating states this way. It basically creates a new staging hash OR simply references a staging hash that already exists. We’ve done the latter hear and it’s important not to make any mistakes. STN is the name we gave our staging hash previously, and neg is the type that states were put under. The 2, is the index number, meaning ‘the second state within the stage’, in this case our second state is ID 7, the Paralysis state that’s in the screenshot. We have correctly referenced this stage, it’s a good idea to turn the Debugger option on when setting up stages this way, just in case.
<Index: 3, Copy: 1, Take: 0> and <Index: 4, Copy: 1, Take: 0> are the notetags used to create entirely new states based on a parent state. In this case, the parent state is Paralysis shown above. With this, all of the data from this state is duplicated and added to a new state with a different state ID. That state ID is then added to the staging hash based on the index; 3 and 4 in this case. Keep in mind that Stun is under index 1, and Paralysis is under index 2. The Copy and Take portions of the notetag refer to the Features lists of this Paralysis state. Copy: 1 means that the first feature (the only feature shown) will be copied over to the new state. If we were to set Take: to 1, then the feature would be copied to the new state and removed from this Paralysis state.
The <Adj_State> notetags are used to modify the newly created states. In the example above, we change the names, icon indexes, state removal turns, and the ‘Message when an actor fell in the state’ values. This is important for differentiating one stage from another. Before we do a test battle, let’s activate the Debugger and see what our staging hash looks like.
As you can see, our stage now includes two additional state IDs. Note that the ID numbers will always be outside of the maximum range of your state database. Since the maximum (seen in the example above) was 25, states created by notetags would begin at 26 and continue from there. If you’ve attempted something like this and ended up with an entirely new staging hash… something went wrong. Anyway, let’s see how this look in-game. Since state icons are only displayed for actors by default, I had an ogre beat-up on Natalie until I got the shots I needed. >_>
That covers the basics. More detailed instructions can be found within the script’s header. I’ll stress once again that developers should make full use of the debugger option within the script’s settings while working on staging. Here’s an example of many staging states within a project. Enjoy!
DOWNLOADS
Current Version : View attachment RINOBI_StateStages_330.txt
Previous Version: View attachment RINOBI_StateStages_320.txt
Previous Version: View attachment RINOBI_StateStages_300.txt
Previous Version: View attachment RINOBI_StateStages_210.txt
Previous Version: View attachment RINOBI_StateStages_200.txt
Previous Version: View attachment RINOBI_StateStages_100.txt
Previous Version: View attachment RINOBI_StateStages_320.txt
Previous Version: View attachment RINOBI_StateStages_300.txt
Previous Version: View attachment RINOBI_StateStages_210.txt
Previous Version: View attachment RINOBI_StateStages_200.txt
Previous Version: View attachment RINOBI_StateStages_100.txt
VERSION HISTORY
- 1.00 [04/29/2016] Initial Release
- 2.00 [05/11/2016] Bug Fixes. Removal Methods Added. User-Friendly Update.
- 2.10 [06/30/2016] State Removal No Longer Displayed While Staging.
- 3.00 [07/27/2016] Note Tag System. Visual Staging Information
- 3.20 [07/29/2016] Added Note Tag for Adjusting State Notes. Multi-Staging Included for Items
- 3.30 [08/14/2016] Multi-Staging Included for All Features.