They are posted below as both .js files to download and place directly in your plugins folder and as spoilered code. The contents of the .js files and the spoilers should be exactly the same, so you only need to download one or the other.
Terms of use for all following snippets:
- Free for use in both non-commercial and commercial games.
- No credit required.
- Edits and reposts allowed.
Require Living Actor
This was requested as a separate snippet from my Summon Actor plugin.
Place the notetag <Require Ling Actor: n> in a skill or item notebox to only enable the skill / item if actor #n is alive.
Download as plugin
Code
Code:
/*:
 * @plugindesc Just the <Require Living Actor> notetag from Summon Actor.
 * @author LadyBaskerville
 *
 * @help
 * ---------------------
 *      Notetag
 * ---------------------
 * You can disable certain skills and items if an actor is dead.
 * Use the notetag
 *     <Require Living Actor: n>
 * to only enable the skill or item if actor n is alive.
 *
 * ---------------------
 *     Terms of use
 * ---------------------
 * - Free for use in both non-commercial and commercial games.
 * - You may repost and edit this plugin.
 * - If you use only this snippet from the Summon Actor plugin,
 *   credit to me as LadyBaskerville is optional.
 *
 */

(function() {

var LB = LB || {};
LB.SummonActor = LB.SummonActor || {};

LB.SummonActor.notetagsLoaded = false;

// ---------------
//   DataManager
// ---------------
DataManager.LB_processReqActNotetags = function(group) {
    for (var i = 0; i < group.length; i++) {
        if (group[i]) {
            if (group[i].meta['Require Living Actor']) {
                group[i]._LB_requiredActor = Number(group[i].meta['Require Living Actor'].trim());
            } else {
                group[i]._LB_requiredActor = null;
            }
        }
    }
};

LB.SummonActor.DataManager_isDatabaseLoaded = DataManager.isDatabaseLoaded;
DataManager.isDatabaseLoaded = function() {
    if (!LB.SummonActor.DataManager_isDatabaseLoaded.call(this)) {
        return false;
    }
    // the database is loaded, we can now preload the notetags if we haven't already done it
    if (!LB.SummonActor.notetagsLoaded) {
        // preload skill and item notetags
        this.LB_processReqActNotetags($dataSkills);
        this.LB_processReqActNotetags($dataItems);
        LB.SummonActor.notetagsLoaded = true;
    }
    return true;
};

// -------------------------
//     Game_BattlerBase
// -------------------------
LB.SummonActor.Game_BattlerBase_canUse = Game_BattlerBase.prototype.canUse;
Game_BattlerBase.prototype.canUse = function(item) {
    if (!LB.SummonActor.Game_BattlerBase_canUse.call(this, item)) return false;
    if (!item._LB_requiredActor) return true;
    if ($gameActors.actor(item._LB_requiredActor).isDead()) return false;
    return true;
};

})();
Shift Enemies (Version 1.1.0)
From this request thread. Allows you to shift enemy battlers outside the boundaries of the Troop window with notetags.
Use <ShiftX: n> and <ShiftY: n> in the enemy notebox to shift the battler n pixels to the right and down, respectively. Use negative values for the opposite directions.
Version 1.1.0: Added Plugin Parameters for default Shift values.
Download as plugin
When you create the .js file yourself, make sure it is named "ShiftEnemies.js".
Code
Code:
/*:
 * @plugindesc v1.1.0 Lets you shift enemy battlers outside the boundaries of the Troop Window with notetags.
 * @author LadyBaskerville
 *
 * @param Default Shift X
 * @desc Default horizontal shift if no notetag is present
 * @default 0
 *
 * @param Default Shift Y
 * @desc Default vertical shift if no notetag is present
 * @default 0
 *
 * @help
 * ShiftEnemies.js
 * Version 1.1.0
 *
 * Use the following notetags in the enemy notebox:
 * <ShiftX: n> to shift the enemy n pixels to the right.
 * <ShiftY: n> to shift the enemy n pixels down.
 * Use negative values of n to shift the enemy in the opposite direction.
 *
 * If you want to offset many enemies by the same amount, you can specify
 * default values for Shift X and Shift Y in the Plugin Parameters.
 * Enemies without Shift notetags will be shifted by the values specified
 * in the parameters.
 *
 * Changelog:
 * Version 1.1.0
 * - Added Default parameters.
 * Version 1.0.0
 * - Finished the plugin.
 *
 * Free for use in both non-commercial and commercial games.
 * No credit required.
 * Edits and reposts allowed.
 */

(function() {

var defShiftX = Number(PluginManager.parameters('ShiftEnemies')['Default Shift X']) || 0;
var defShiftY = Number(PluginManager.parameters('ShiftEnemies')['Default Shift Y']) || 0;

_GameTroop_setup = Game_Troop.prototype.setup;
Game_Troop.prototype.setup = function(troopId) {
    _GameTroop_setup.call(this, troopId);
   this.shiftEnemies();
};

Game_Troop.prototype.shiftEnemies = function() {
   this._enemies.forEach(function(e) {
       if (e.enemy().meta.ShiftX) {
           e._screenX += Number(e.enemy().meta.ShiftX);
       } else {
           e._screenX += defShiftX;
       }
       if (e.enemy().meta.ShiftY) {
           e._screenY += Number(e.enemy().meta.ShiftY);
       } else {
           e._screenY += defShiftY;
       }
   }, this);
};

// Compatability
if (typeof Imported !== 'undefined' && Imported.YEP_BattleEngineCore) {
   Window_EnemyVisualSelect.prototype.makeWindowBoundaries = function() {
       if (!this._requestRefresh) return;
       this._minX = -1 * this.standardPadding();
       this._maxX = Graphics.boxWidth - this.width + this.standardPadding();
       this._minY = -1 * this.standardPadding();
       this._maxY = Graphics.boxHeight - this.height + this.standardPadding();
   };
}

})();
Shift Actors (Version 1.1.0)
Allows you to shift SV actors with notetags
Use <ShiftX: n> and <ShiftY: n> in the actor notebox to shift the battler n pixels to the right and down, respectively. Use negative values for the opposite directions.
Version 1.1.0: Added Plugin Parameters for default Shift values.
Download as plugin
When you create the .js file yourself, make sure it is named "ShiftActors.js".
Code
Code:
/*:
 * @plugindesc Lets you shift SV actors with notetags.
 * @author LadyBaskerville
 *
 * @param Default Shift X
 * @desc Default horizontal shift if no notetag is present
 * @default 0
 *
 * @param Default Shift Y
 * @desc Default vertical shift if no notetag is present
 * @default 0
 *
 * @help
 * ShiftActors.js
 * Version 1.1.0
 *
 * Use the following notetags in the actor notebox:
 * <ShiftX: n> to shift the actor n pixels to the right.
 * <ShiftY: n> to shift the actor n pixels down.
 * Use negative values of n to shift the actor in the opposite direction.
 *
 * If you want to offset many actors by the same amount, you can specify
 * default values for Shift X and Shift Y in the Plugin Parameters.
 * Actors without Shift notetags will be shifted by the values specified
 * in the parameters.
 *
 * Free for use in both non-commercial and commercial games.
 * No credit required.
 * Edits and reposts allowed.
 */

(function() {

var defShiftX = Number(PluginManager.parameters('ShiftActors')['Default Shift X']) || 0;
var defShiftY = Number(PluginManager.parameters('ShiftActors')['Default Shift Y']) || 0;

_Sprite_Actor_setActorHome = Sprite_Actor.prototype.setActorHome;
Sprite_Actor.prototype.setActorHome = function(index) {
   _Sprite_Actor_setActorHome.call(this, index);
   var id = this._actor._actorId;

   if ($dataActors[id].meta.ShiftX) {
       this.setHome(this._homeX + Number($dataActors[id].meta.ShiftX), this._homeY);
   } else {
       this.setHome(this._homeX + defShiftX, this._homeY);
   }
   if ($dataActors[id].meta.ShiftY) {
       this.setHome(this._homeX, this._homeY + Number($dataActors[id].meta.ShiftY));
   } else {
       this.setHome(this._homeX, this._homeY + defShiftY);
   }
};

})();
Enemy Placement (Version 1.0.1)
Lets you place enemy battlers using a semi-dynamic formula. More information in the Help file.
Download as plugin
When you create the .js file yourself, make sure it is named "EnemyPlacement.js".
Code
Code:
/*:
 * @plugindesc v1.0.1 Lets you place enemy battlers using a semi-dynamic formula.
 * @author LadyBaskerville
 *
 * @param Use Default Placement
 * @desc If true, all enemies with no notetags will be placed at the default position specified in the parameters below.
 * @type boolean
 * @default false
 *
 * @param Default X Position
 * @desc X position if no notetag is present. Default: 16 + (troopSize + 2) * 32 - index * 32
 * @default 16 + (troopSize + 2) * 32 - index * 32
 *
 * @param Default Y Position
 * @desc Y position if no notetag is present. Default: screenHeight - statusHeight - troopSize * 48 + (index+1) * 48 - 32
 * @default screenHeight - statusHeight - troopSize * 48 + (index+1) * 48 - 32
 *
 * @help
 * EnemyPlacement.js
 * Version 1.0.1
 *
 * Use the following notetags in the enemy notebox:
 *
 * <XPosEval: [expression]> and <YPosEval: [expression]>
 * to place the enemy graphic at the X/Y position to which the Javascript line
 * [expression] evaluates. You can also use pure numbers.
 *
 * <UseDefaultXPos> and <UseDefaultYPos>
 * to place the enemy graphic at the default position specified
 * in this plugin's parameters.
 *
 * The plugin parameters allow you to set default formulas for the X and Y
 * positions. Set the parameter "Use Default Placement" to true if all
 * enemies without their own <X/YPosEval> notetags should use these default
 * values. You can also keep "Use Default Placement" set to false and use
 * the <UseDefaultX/YPos> notetags for each enemy that should be placed
 * at the default position.
 *
 * You can use the following variables as part of [expression]:
 * screenWidth - the width of the game window in pixels
 * screenHeight - the height of the game window in pixels
 * troopSize - the number of enemies in the troop
 * index - the index of the enemy within the troop
 * statusHeight - the height of the status window
 * (If you know what you are doing, you can also use:
 *  this - the Game_Troop object
 *  e - the Game_Enemy object)
 * For reference, the default X/Y positions in the parameters are:
 * X: 16 + (troopSize + 2) * 32 - index * 32
 * Y: screenHeight - statusHeight - troopSize * 48 + (index+1) * 48 - 32
 *
 * Changelog:
 * Version 1.0.1
 * - Fixed a mistake in the calculation of statusHeight.
 * Version 1.0.0
 * - Finished the plugin.
 *
 * Free for use in both non-commercial and commercial games.
 * No credit required.
 * Edits and reposts allowed.
 */

(function() {

var baseStatusHeight = 4;

// Compatability
if (typeof Imported !== 'undefined' && Imported.YEP_BattleEngineCore) {
   Window_EnemyVisualSelect.prototype.makeWindowBoundaries = function() {
       if (!this._requestRefresh) return;
       this._minX = -1 * this.standardPadding();
       this._maxX = Graphics.boxWidth - this.width + this.standardPadding();
       this._minY = -1 * this.standardPadding();
       this._maxY = Graphics.boxHeight - this.height + this.standardPadding();
   };

   baseStatusHeight = eval(Yanfly.Param.BECCommandRows);
}

var defXPosEval = PluginManager.parameters('EnemyPlacement')['Default X Position'] || 0;
var defYPosEval = PluginManager.parameters('EnemyPlacement')['Default Y Position'] || 0;
var useDef = PluginManager.parameters('EnemyPlacement')['Use Default Placement'] == 'true';

_GameTroop_setup = Game_Troop.prototype.setup;
Game_Troop.prototype.setup = function(troopId) {
    _GameTroop_setup.call(this, troopId);
   this.placeEnemies();
};

Game_Troop.prototype.placeEnemies = function() {
   var screenWidth = Graphics.boxWidth;
   var screenHeight = Graphics.boxHeight;
   var troopSize = this._enemies.length;
   var statusHeight = baseStatusHeight * Window_Base.prototype.lineHeight.call(this);
   statusHeight += Window_Base.prototype.standardPadding.call(this) * 2;
   for (var index = 0; index < this._enemies.length; index ++) {
       var e = this._enemies[index];
       if (e.enemy().meta.XPosEval) {
           e._screenX = eval(e.enemy().meta.XPosEval);
       } else if (useDef || e.enemy().meta.UseDefaultXPos) {
           e._screenX = eval(defXPosEval);
       }
       if (e.enemy().meta.YPosEval) {
           e._screenY = eval(e.enemy().meta.YPosEval);
       } else if (useDef || e.enemy().meta.UseDefaultYPos) {
           e._screenY = eval(defYPosEval);
       }
   }
};

})();
Weapon Modifier
From this request thread. Lets you specify a Modifier formula (number or javascript) in a weapon notetag and call it in the damage formula. More information in the Help file.
Download as plugin
When you create the .js file yourself, make sure it is named "WeaponModifier.js".
Code
Code:
/*:
 * @plugindesc Specify an additional formula for weapons to include in the damage formula.
 * @author LadyBaskerville
 *
 * @param Default weapon modifier
 * @desc The value used for 'wm' if the equipped weapon has no Modifier tag.
 * @default 0
 *
 * @param Default enemy modifier
 * @desc The value used for 'wm' if the attacker is an enemy.
 * @default 0
 *
 * @help
 * WeaponModifier.js
 *
 * Use the notetag <Modifier: x> in the weapon notebox to specify a Weapon
 * Modifier formula.
 * x can be a number or line of Javascript code that uses the same context
 * as a skill's damage formula. ('a' = the user, 'b' = the target,
 * 'v[n]' = the value of variable n, 'this' = the Game_Action object)
 *
 * Example: <Modifier: a.mhp / a.hp>
 * Gives the weapon a higher Modifier if the user has less HP.
 *
 * To use the Modifier in damage calculation, include 'wm' in the damage
 * formula.
 *
 * Example: a.atk * 4 - b.def * 2 + wm * 0.2
 *
 * Free for use in both non-commercial and commercial games.
 * No credit required.
 * Edits and reposts allowed.
 */

(function() {

var params = PluginManager.parameters('WeaponModifier');
var weaponDefault = params['Default weapon modifier'];
var enemyDefault = params['Default enemy modifier'];

Game_Battler.prototype.getWeaponModifier = function() {
    if (this.isActor()) {
        var w = $dataWeapons[this._equips[0]._itemId];
        if (w.meta.Modifier) {
            return w.meta.Modifier;
        } else {
            return weaponDefault;
        }
    } else {
        return enemyDefault;
    }

};

Game_Action.prototype.evalDamageFormula = function(target) {
    try {
        var item = this.item();
        var a = this.subject();
        var b = target;
        var v = $gameVariables._data;
        var wm = eval(a.getWeaponModifier());
        var sign = ([3, 4].contains(item.damage.type) ? -1 : 1);
        var value = Math.max(eval(item.damage.formula), 0) * sign;
        if (isNaN(value)) value = 0;
        return value;
    } catch (e) {
        return 0;
    }
};

})();
Weapon Over Actor (Version 1.0.1)
From this request thread. Lets you change the order in which Sideview actor and weapon are drawn. Use the notetag <Weapon Over Actor> in the actor or weapon notebox to show the weapon image on top of the actor image. Warning: Might not work when changing weapons during battle.
Download as plugin
Code
Code:
/*:
 * @plugindesc v1.0.1 For sideview battle, change the order in which weapon and actor are drawn.
 * @author LadyBaskerville
 *
 * @help
 * Use the notetag <Weapon Over Actor> in the actor or weapon notebox
 * to draw the weapon image on top of the actor image.
 * Might not work when changing weapons during battle.
 *
 * Free for use in both non-commercial and commercial games.
 * No credit required.
 * Edits and reposts allowed.
 */

Sprite_Actor.prototype.initMembers = function() {
    Sprite_Battler.prototype.initMembers.call(this);
    this._battlerName = '';
    this._motion = null;
    this._motionCount = 0;
    this._pattern = 0;
   this.createSprites();
};

Sprite_Actor.prototype.createSprites = function() {
   this.createShadowSprite();
   if (this._actor && ($dataActors[this._actor._actorId].meta["Weapon Over Actor"] ||
                        ($dataWeapons[this._actor._equips[0]._itemId] && $dataWeapons[this._actor._equips[0]._itemId].meta["Weapon Over Actor"]))) {
       this.createMainSprite();
       this.createWeaponSprite();
   } else {
       this.createWeaponSprite();
       this.createMainSprite();
   }
   this.createStateSprite();
};

Sprite_Actor.prototype.setBattler = function(battler) {
    Sprite_Battler.prototype.setBattler.call(this, battler);
    var changed = (battler !== this._actor);
    if (changed) {
        this._actor = battler;
        if (battler) {
            this.setActorHome(battler.index());
        }
       this.createSprites();
        this.startEntryMotion();
        this._stateSprite.setup(battler);
    }
};
Reflect onto Opponent
From this request thread. Changes the way magic reflection works - with the plugin, magic will allways be reflected onto the opponents' unit, even if an ally cast the spell. More information in the Help file.
Download as plugin
Code
Code:
/*:
 * @plugindesc Changes Magic Reflection: Magic is always reflected onto an opponent.
 * @author LadyBaskerville
 *
 * @help
 * Version 1.0.1
 *
 * With this plugin enabled, all skill with Hit Type: Magical Attack
 * will be reflected onto an opponent when Magic Reflection occurs.
 * If the attacker is an opponent, the magic will be reflected onto
 * the attacker (same as default reflection). If the attacker is
 * an ally, the magic will be reflected onto a random member of the
 * opponents' unit.
 *
 * You can let skills of other Hit Types use Magic Reflection
 * by placing the Notetag <EnableMRF> in the skill's notebox.
 *
 * Free for use in both non-commercial and commercial games.
 * No credit required.
 * Edits and reposts allowed.
 */

_BattleManager_invokeMagicReflection = BattleManager.invokeMagicReflection;
BattleManager.invokeMagicReflection = function(subject, target) {
   if (subject.opponentsUnit().members().contains(target)) {
       _BattleManager_invokeMagicReflection.call(this, subject, target);
   } else {
       var randOpp = subject.opponentsUnit().randomTarget();
       if (randOpp) {
           var tempSubj = this._subject;
           subject = randOpp;
           this._subject = subject;
           _BattleManager_invokeMagicReflection.call(this, subject, target);
           this._subject = tempSubj;
       }
   }
};


Game_Action.prototype.itemMrf = function(target) {
    if (this.isMagical() || $dataSkills[this._item._itemId].meta.EnableMRF) {
        return target.mrf;
    } else {
        return 0;
    }
};
Battle Log Weaknesses
From this thread. Shows a message in the Battle Log when an elemental weakness or resistance is hit (Element Rate above or below 100%, respectively). Note: The plugin is not extensively tested and probably won't play nice with larger battle engine type plugins because it's overriding the Window_BattleLog.displayActionResults function. I may add compatibility with Yanfly's Battle Engine Core or other (free, unobfuscated) battle engine plugins at request, provided they don't make extensive changes to how the battle log is handled.
Download as Plugin
When you create the .js file yourself, make sure it is named "LB_BattleLogWeaknesses.js".
Code
JavaScript:
/*:
 * @plugindesc Show elemental weaknesses/resistances in the battle log
 * @author LadyBaskerville
 *
 * @help
 * Version 1.0.0
 * LB_BattleLogWeaknesses.js
 *
 * Free for use in both non-commercial and commercial games.
 * Free to edit and repost.
 * Credit appreciated, but not required.
 *
 * @param Weakness Message
 * @desc The message that is displayed when a weakness is hit
 * @default Weakpoint!
 *
 * @param Resistance Message
 * @desc The message that is displayed when a resistance is hit
 * @default Resist!
 *
 */


var LB = LB || {};
LB.BattleLogWeaknesses = LB.BattleLogWeaknesses || {};

LB.BattleLogWeaknesses.weakMsg = String(PluginManager.parameters('LB_BattleLogWeaknesses')['Weakness Message']);
LB.BattleLogWeaknesses.resistMsg = String(PluginManager.parameters('LB_BattleLogWeaknesses')['Resistance Message']);

// OVERWRITE
Window_BattleLog.prototype.displayActionResults = function(subject, target) {
    if (target.result().used) {
        this.push('pushBaseLine');
        this.displayCritical(target);
        this.LB_displayWeakness(target);
        this.push('popupDamage', target);
        this.push('popupDamage', subject);
        this.displayDamage(target);
        this.displayAffectedStatus(target);
        this.displayFailure(target);
        this.push('waitForNewLine');
        this.push('popBaseLine');
    }
};

// new
Window_BattleLog.prototype.LB_displayWeakness = function(target) {
    if (target.result().elementRate > 1) {
        this.push('addText', LB.BattleLogWeaknesses.weakMsg);
    } else if (target.result().elementRate < 1){
        this.push('addText', LB.BattleLogWeaknesses.resistMsg);
    }
};

LB.BattleLogWeaknesses.Game_ActionResult_clear = Game_ActionResult.prototype.clear;
Game_ActionResult.prototype.clear = function() {
    LB.BattleLogWeaknesses.Game_ActionResult_clear.call(this);
    this.elementRate = 1;
};

LB.BattleLogWeaknesses.Game_Action_apply = Game_Action.prototype.apply;
Game_Action.prototype.apply = function(target) {
    LB.BattleLogWeaknesses.Game_Action_apply.call(this, target);
    let result = target.result();
    if (result.isHit()) {
        result.elementRate = this.calcElementRate(target);
    }
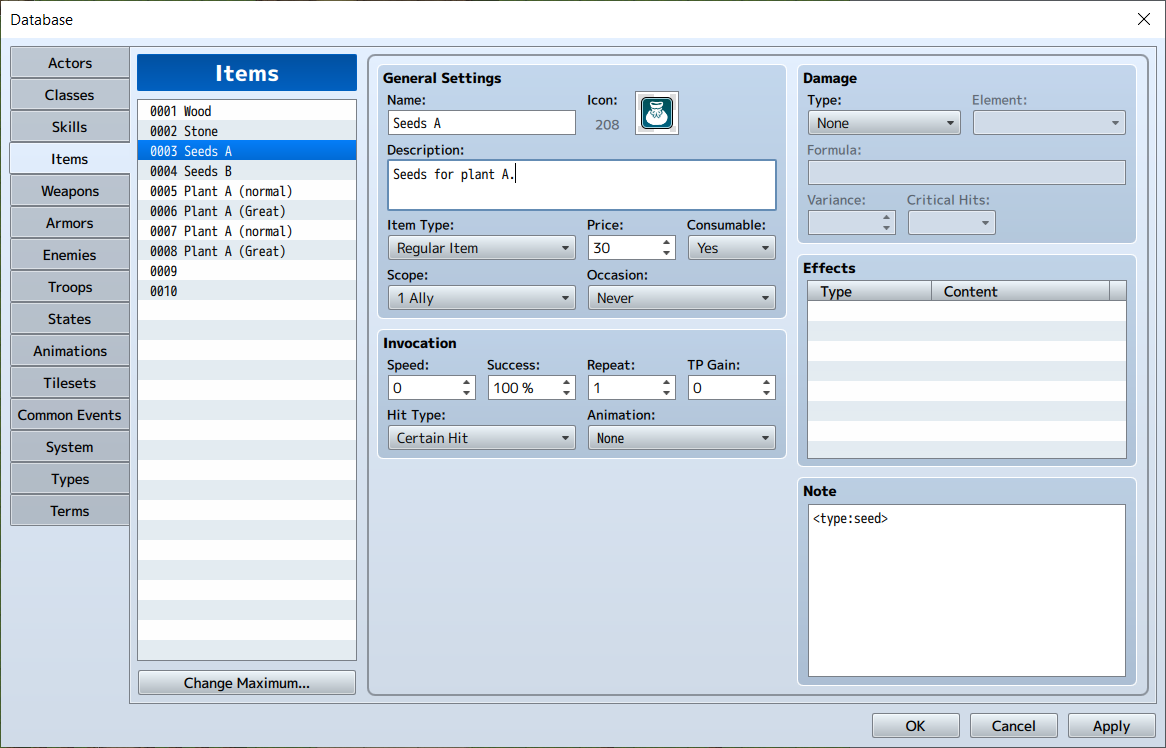
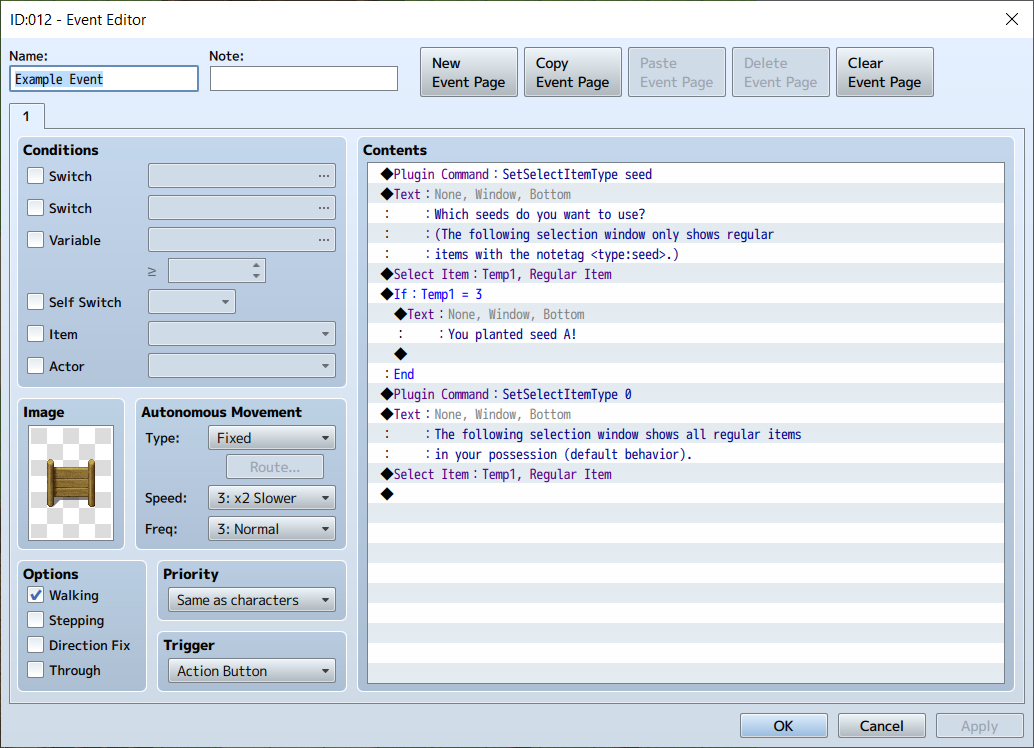
};Only show specific kinds of items in the Select Item window, for when the Item Type distinction in the database isn't enough. Use the notetag <type:[customType]> in the item's notebox. Before using the Select Item command in an event, use the plugin command SetSelectItemType [customType] to only show items with the corresponding notetag in the Select Item window. Use the plugin command SetSelectItemType 0 to return to the default behavior (showing all regular items/key items/hidden items A/B in the selection window).
Usage Example
Here's an bare-bones example for how this plugin can be used to select seeds for planting as part of a simple farming game:
Code
JavaScript:
/*:
 * @plugindesc Only show specific custom types of items in the Select Item window.
 * @author LadyBaskerville
 *
 * @help
 * CustomItemChoices
 * Version 1.0.0
 * by LadyBaskerville
 *
 * Item notetag: <type:[customType]>
 *
 * Before using the Select Item command in an event, use the plugin command
 * SetSelectItemType [customType]
 * to only show items with the notetag <type:[customType]> in the Select Item window.
 *
 * Use the plugin command
 * SetSelectItemType 0
 * to return to the default behavior (showing all items in the selection window).
 *
 * Free for use in both non-commercial and commercial games.
 * Credit appreciated, but not required.
 *
 */

(function() {

var LB = LB || {};
LB.MoreItemChoices = LB.MoreItemChoices || {};


LB.MoreItemChoices.Game_Interpreter_pluginCommand = Game_Interpreter.prototype.pluginCommand;
Game_Interpreter.prototype.pluginCommand = function(command, args) {
    LB.MoreItemChoices.Game_Interpreter_pluginCommand.call(this, command, args);

    if (command == 'SetSelectItemType') {
        if (args[0] == '0') {
            $gameMessage.setItemChoiceCustomType(0);
        }
        else {
            $gameMessage.setItemChoiceCustomType(args[0]);
        }
    }
    return false;
};

Game_Message.prototype.setItemChoiceCustomType = function(customType) {
    this._itemChoiceCustomType = customType;
};

Game_Message.prototype.itemChoiceCustomType = function(customType) {
    return this._itemChoiceCustomType;
};

Window_EventItem.prototype.includes = function(item) {
    var itypeId = $gameMessage.itemChoiceItypeId();
    var customType = $gameMessage.itemChoiceCustomType();
    if (customType == 0 || customType == '') {
        return DataManager.isItem(item) && item.itypeId === itypeId;
    } else {
    return DataManager.isItem(item) && item.itypeId === itypeId && item.meta.type === customType;
    }
};

})();
I hope someone finds use in some of these small snippets :)